Save eVars With Classifications in Adobe Analytics
In this post I write about one of the great things that classifications (aka SAINT classifications) can add to an Adobe Analytics implementation – the ability to save eVars.
The Basics
One of the best use cases for classifications has to be products. In many ecommerce implementations classifications are used to translate individual product SKUs or product IDs into human readable product names and categories. This is often done with a SAINT file upload process, where a file is ingested into Adobe Analytics which has a “key” (the product SKU or ID) and one or many classifications of that key. This lets analysts use human friendly names in Analysis Workspace and in reports. View the official documentation if you need more details about the basics of classifications and SAINT files. Apart from translating SKUs or IDs into readable values, another benefit of classifications is the ability to save on limited eVars/props.
Saving eVars/Props With Classifications
This is one of my favorite features of classifications. Many companies have switched to use a “global” report suite where multiple websites or apps send data to the one single report suite. Having the one report suite is often helpful for analysis purposes, but it means that the available eVars/props have to be shared among the websites and apps that send data to the suite. Even if you are not using a global report suite, you might find yourself running short of eVars to use. A solution which can help is classifications and the classification rule builder.
In a simple implementation each eVar might correspond to a single dimension. But if we run short on eVars we can instead store multiple related values in the one eVar. Keep in mind that eVars have a size limit of 255 bytes, but it’s still possible to store many values inside that one eVar. Those values can be split up into their own dimensions for use in reporting.
For example, say your website has many user input forms and you need to keep track of the performance (starts, completes, conversion rates) of each of them. You have many values which describe a particular form, such as type, name, step name, step number and stage. You can use eVars for each of these values, but that would use five eVars when we could use just one!
Reporting Requirements:
Form Type eg “business” or “help form” or “authentication form”
Form Name eg “submit and enquiry” or “login” or “request a quote”
Form Step Name eg “enter your details” or “describe your issue”
Form Step Number eg “1” or “2”
Form Stage eg “start” or “complete”
Analysts may need to view performance by Form Type or Form Name or even down to the Form Step Name granularity, so it’s important that we have a dimension in Workspace for each one. We can do this with one eVar, some classifications, and a set of classification rules.
Note that this example works because the combination of each of those values would not get close to the 255 byte eVar limit. In other scenarios that may not always be the case.
Capture the eVar
In your tags implementation you can capture the values above into a single eVar using a delimiter. You would end up with a long string captured into the eVar. It’s important to choose a delimiter that won’t ever appear in any of the values you need to capture. For example the pipe “|” or colon “:” symbol are great delimiters, but they might appear in a Form Name and that would break the classifications. Or you could strip the delimiter from any values at data collection time, in the tag manager for example, to ensure those characters don’t appear.
var formId = digitalData.form.id;
var formType = digitalData.form.type;
var formName = digitalData.form.name;
var formStepName = digitalData.form.stepName;
var formStepNumber = digitalData.form.stepNumber;
var formStage = digitalData.form.stage;

if (!formId) {formId = "n/a"}
if (!formType) {formType = "n/a"}
if (!formName) {formName = "n/a"}
if (!formStepName) {formStepName = "n/a"}
if (!formStepNumber) {formStepNumber = "n/a"}
if (!formStage) {formStage = "n/a"}

s.eVar15 = formId + ":" + formType + ":" + formName + ":" + formStepName + ":" + formStepNumber + ":" + formStage;
In the example above I am getting the values from the data layer first, and then I ensure that there is a string value for each. If one of the fields is ‘falsy’ (ie it doesn’t exist or is empty) then I set it to “n/a” to ensure there is a value captured for each. This step is important later for the classification rule builder. Finally I build a long string of the values. There are better ways to use custom code to do this, and even better ways by using data elements and/or extensions, but I chose this example for readability.
Classifications
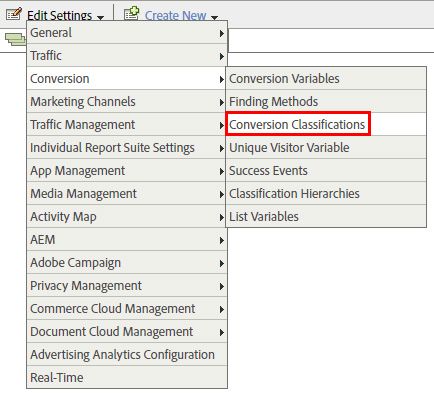
Now you have an eVar which captures a long string of values. The next step is to create classifications for that eVar which split the string into multiple dimensions. That’s done in the Adobe Analytics report suite settings. Navigate to the admin interface for report suites, select your report suite, and select Conversion > Conversion Classifications. Then choose the eVar you are using.

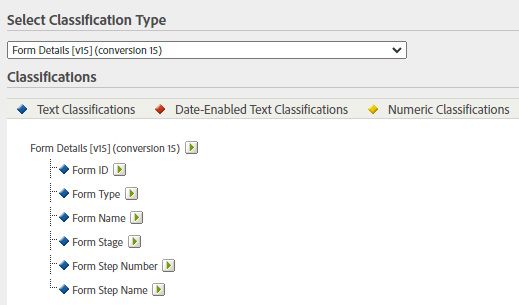
In this step we are simply informing Adobe Analytics what classifications to expect, and the name of those classifications. Create one for Form Name, Form Type, and so on. You can give each a description too. The names here would be what appears in Analysis Workspace. These are “text classifications” meaning that the values are going to be simple text attributes. After creating some classifications it might look as shown below.

Classification Rule Builder
Now you have an eVar with classifications set up. Time to populate those classifications with the vales from the eVar in an automated way. That’s the Classification Rule Builder. You can get to this UI via Admin > Classification Rule Builder in Adobe Analytics.
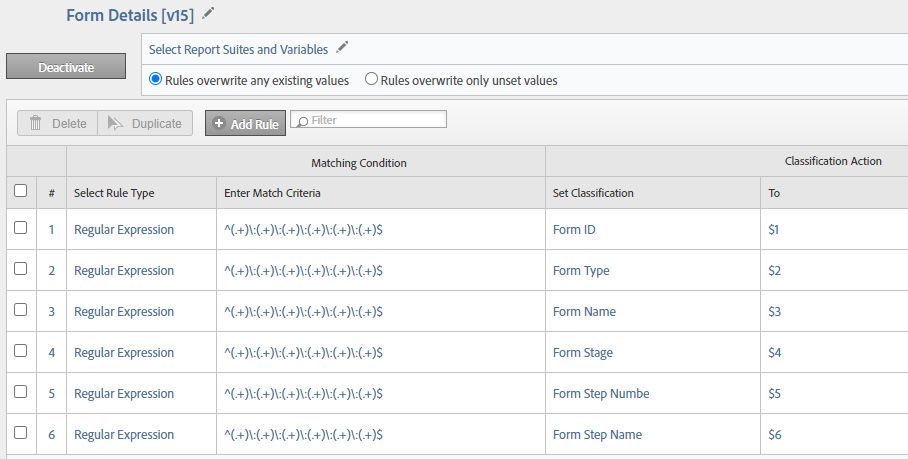
Create a new rule set and give it a name, like Form Details. I often specify the eVars I am targeting in the name too. Then you can select the report suite and eVars you are going to run these rules against. And finally you can create the rules which populate the classification dimensions.

In this example above I have created six rules to map the six classifications of Form Details. Each one is a Regular Expression which is matching a string split into six parts with a “:” colon delimiter. With that I can set each of the classifications as one of the six parts with the $X notation, shown on the right. (eg $1, $2, etc) This is why it’s important that the string of eVar15 should have exactly six parts with colon delimiter, hence the “n/a” values of an earlier step to ensure there is always six parts. If my string had only five parts these rules would not give desired results.
What this step does is create a set of rules to run at data ingestion which populates eVar15s classifications.
Results In Adobe Analytics
Now it’s time to see how the data can look inside Adobe Analytics.

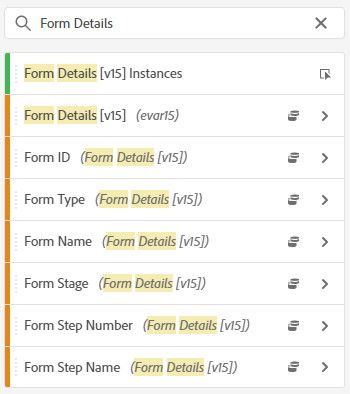
When I do a search for the name of eVar15 Form Details then I get a nice list of each of the classifications. I can use any of these, or a combination of them. I can also use the raw value of eVar15 too! If the rules inside Classification Rule Builder are active, then we should be able to see values in each of these dimensions. We can also use any of these dimensions other success events sent with the hit that contains eVar15 – such as a Form Start or a Form Complete event.
We have just turned one eVar into five dimensions – or six if you include the raw value of eVar15 too. That could be vitally important in large implementations! There is a lot more that classifications can offer analysts, but I’ll leave that for another post.